Untether Yourself from your Panels with Newline Cast
Newline Cast is an app. That is included with your Newline Panel. In this example we are using the Newline Q Series, but most of the options in this post should also apply to the RS+ panels.
Newline Cast is essentially a ‘receiver’ on your panel that can be used to wirelessly stream content from Windows, Chromes OS, iOS and other devices.
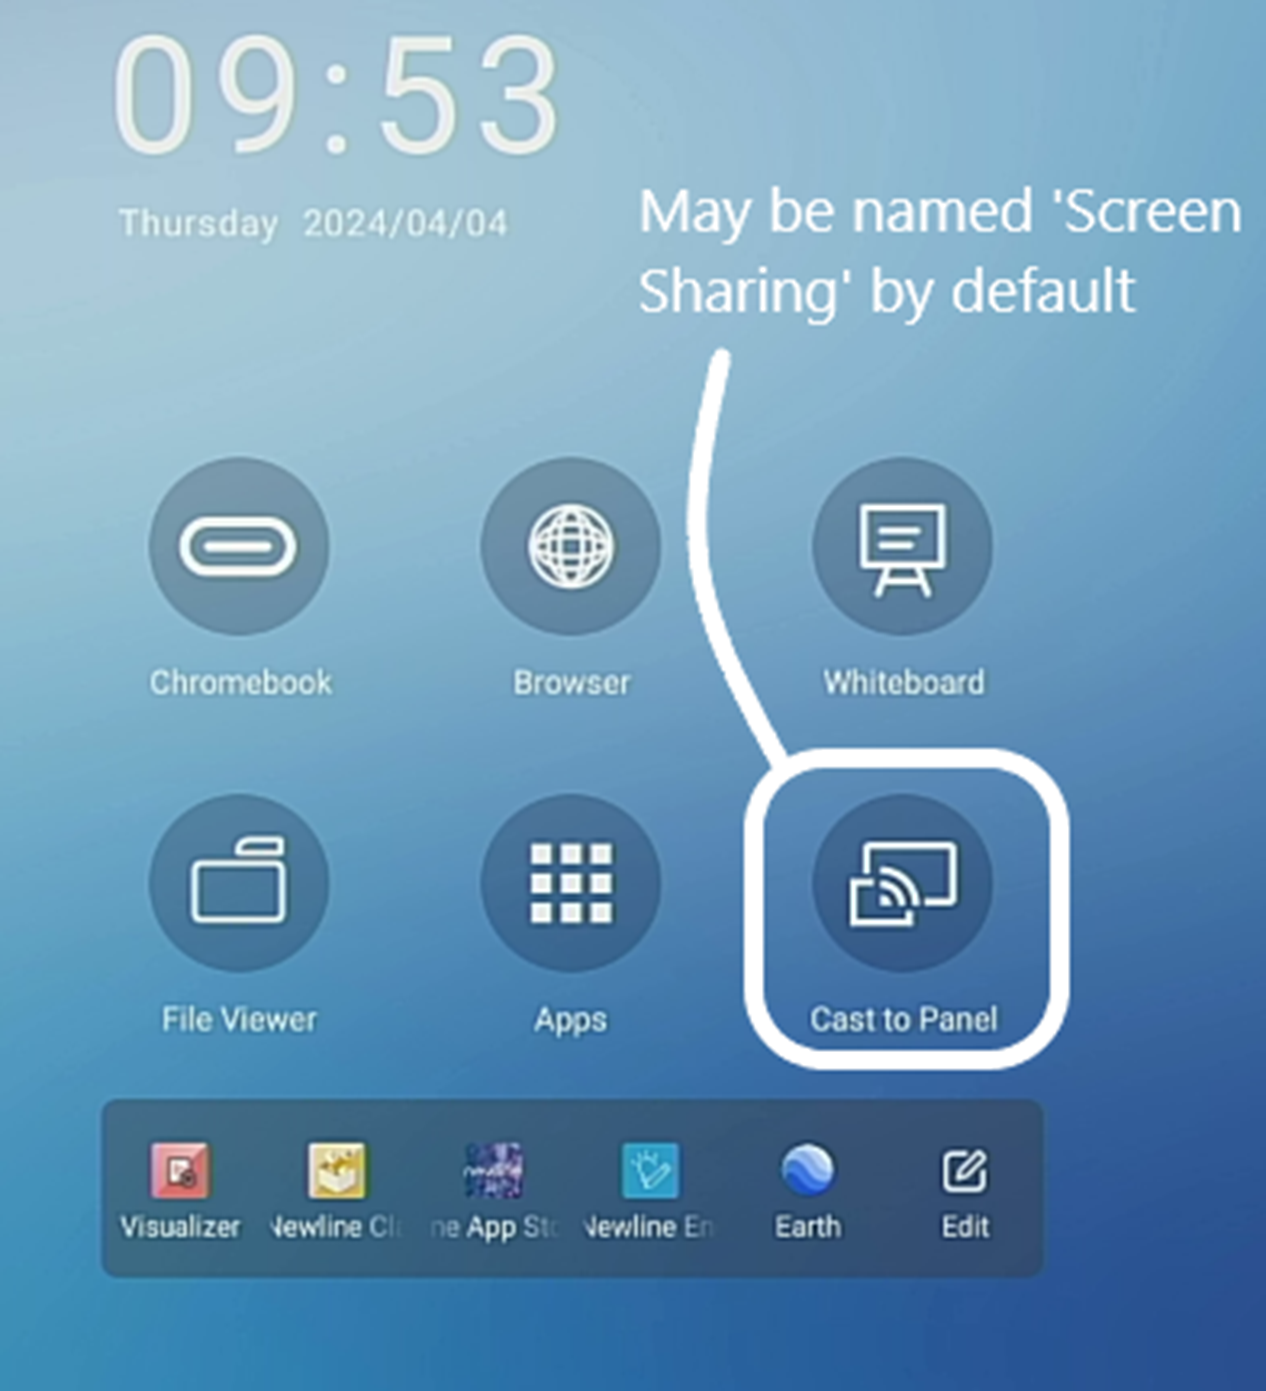
The Newline Cast App. Should be visible on your panel ‘Home’ screen. It is labeled ‘Screen Sharing’ be default (figure 1)
Note – I personally change the name of the app. To ‘Cast to Panel’, I find that ‘Screen Sharing’ is a little ambiguous. To change the name of the app., long-press on the icon (press and hold), then tap on the text name and you can add a new name for the app.
Figure 1
Configuring the Newline Cast App.
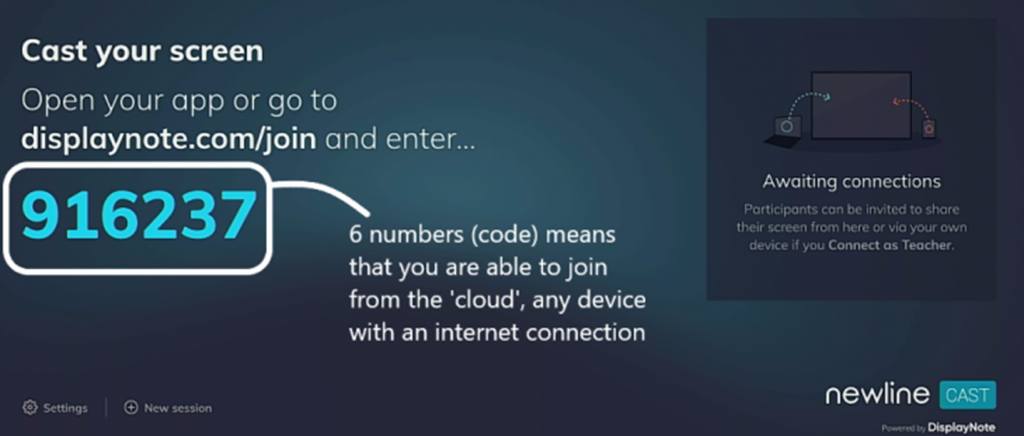
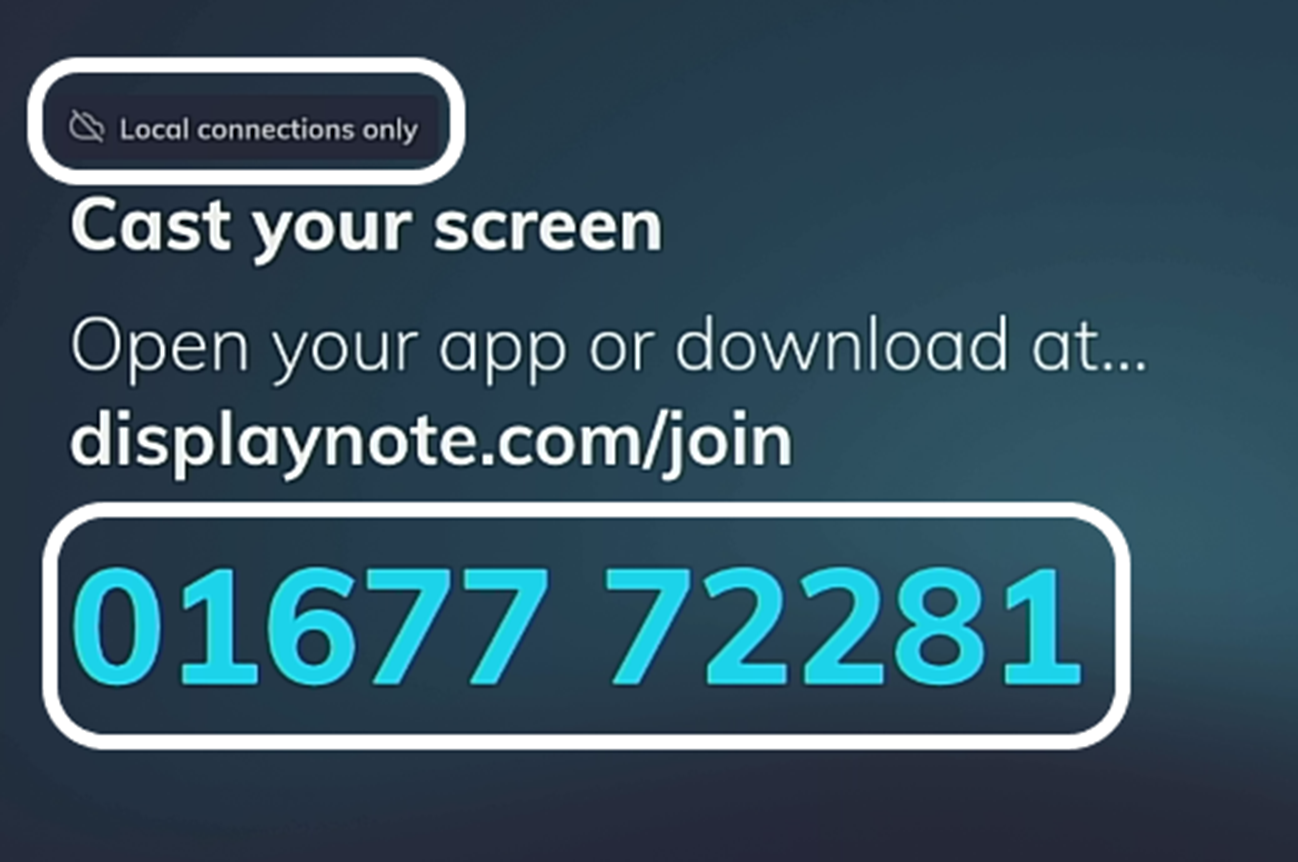
If you open the Newline Cast app., you will see 6 numbers on the screen by default (figure 2). If you see 6 numbers, the app. Is set to use the ‘cloud’, meaning you can cast to the panel from anywhere that has an internet connection.
This is a good option if you want to have external educators or students present from outside of the school. These is a potential disadvantage in that you may see higher latency or dropped connections, in particular if your school has not whitelisted the domain or IP range in their firewall.
Figure 2
The other option is to have the app. only use your local Wi-Fi connection. To enable this, go to ‘Settings’>Security’>Local Connections Only’ and change this to ‘On’ (figure 3). When you close this window, you will see that there are now 10 numbers shown. This indicates that you are using the local wireless only (see figure 4).
The advantage of this is that there is potentially less latency, and that you are not at risk of being compromised by the school’s firewalls and security.
Note – I typically use my local wireless connection, unless I want to have external folks present on my panel.
Figure 3
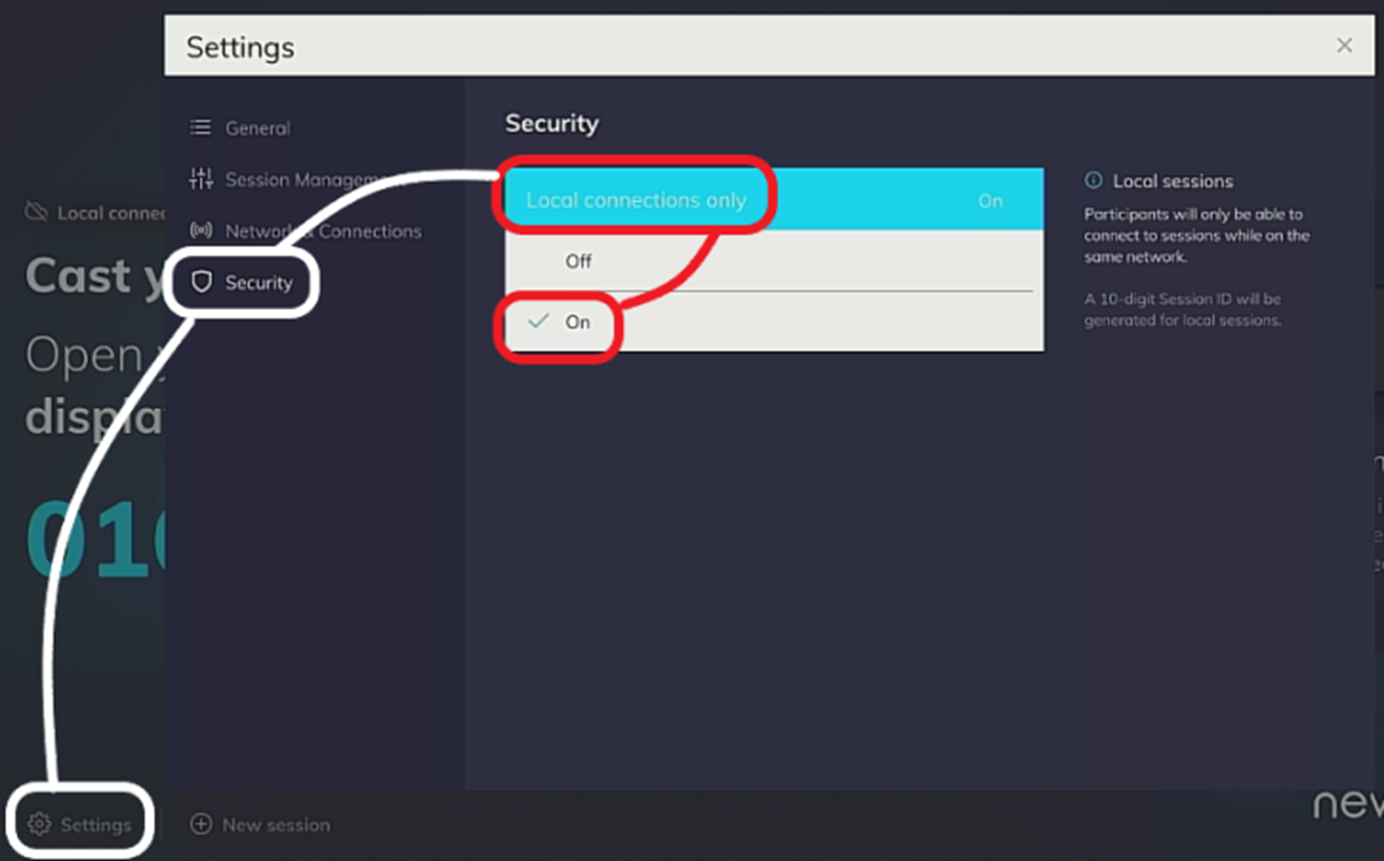
Figure 4
Enabling Apple AirPlay & Google Cast
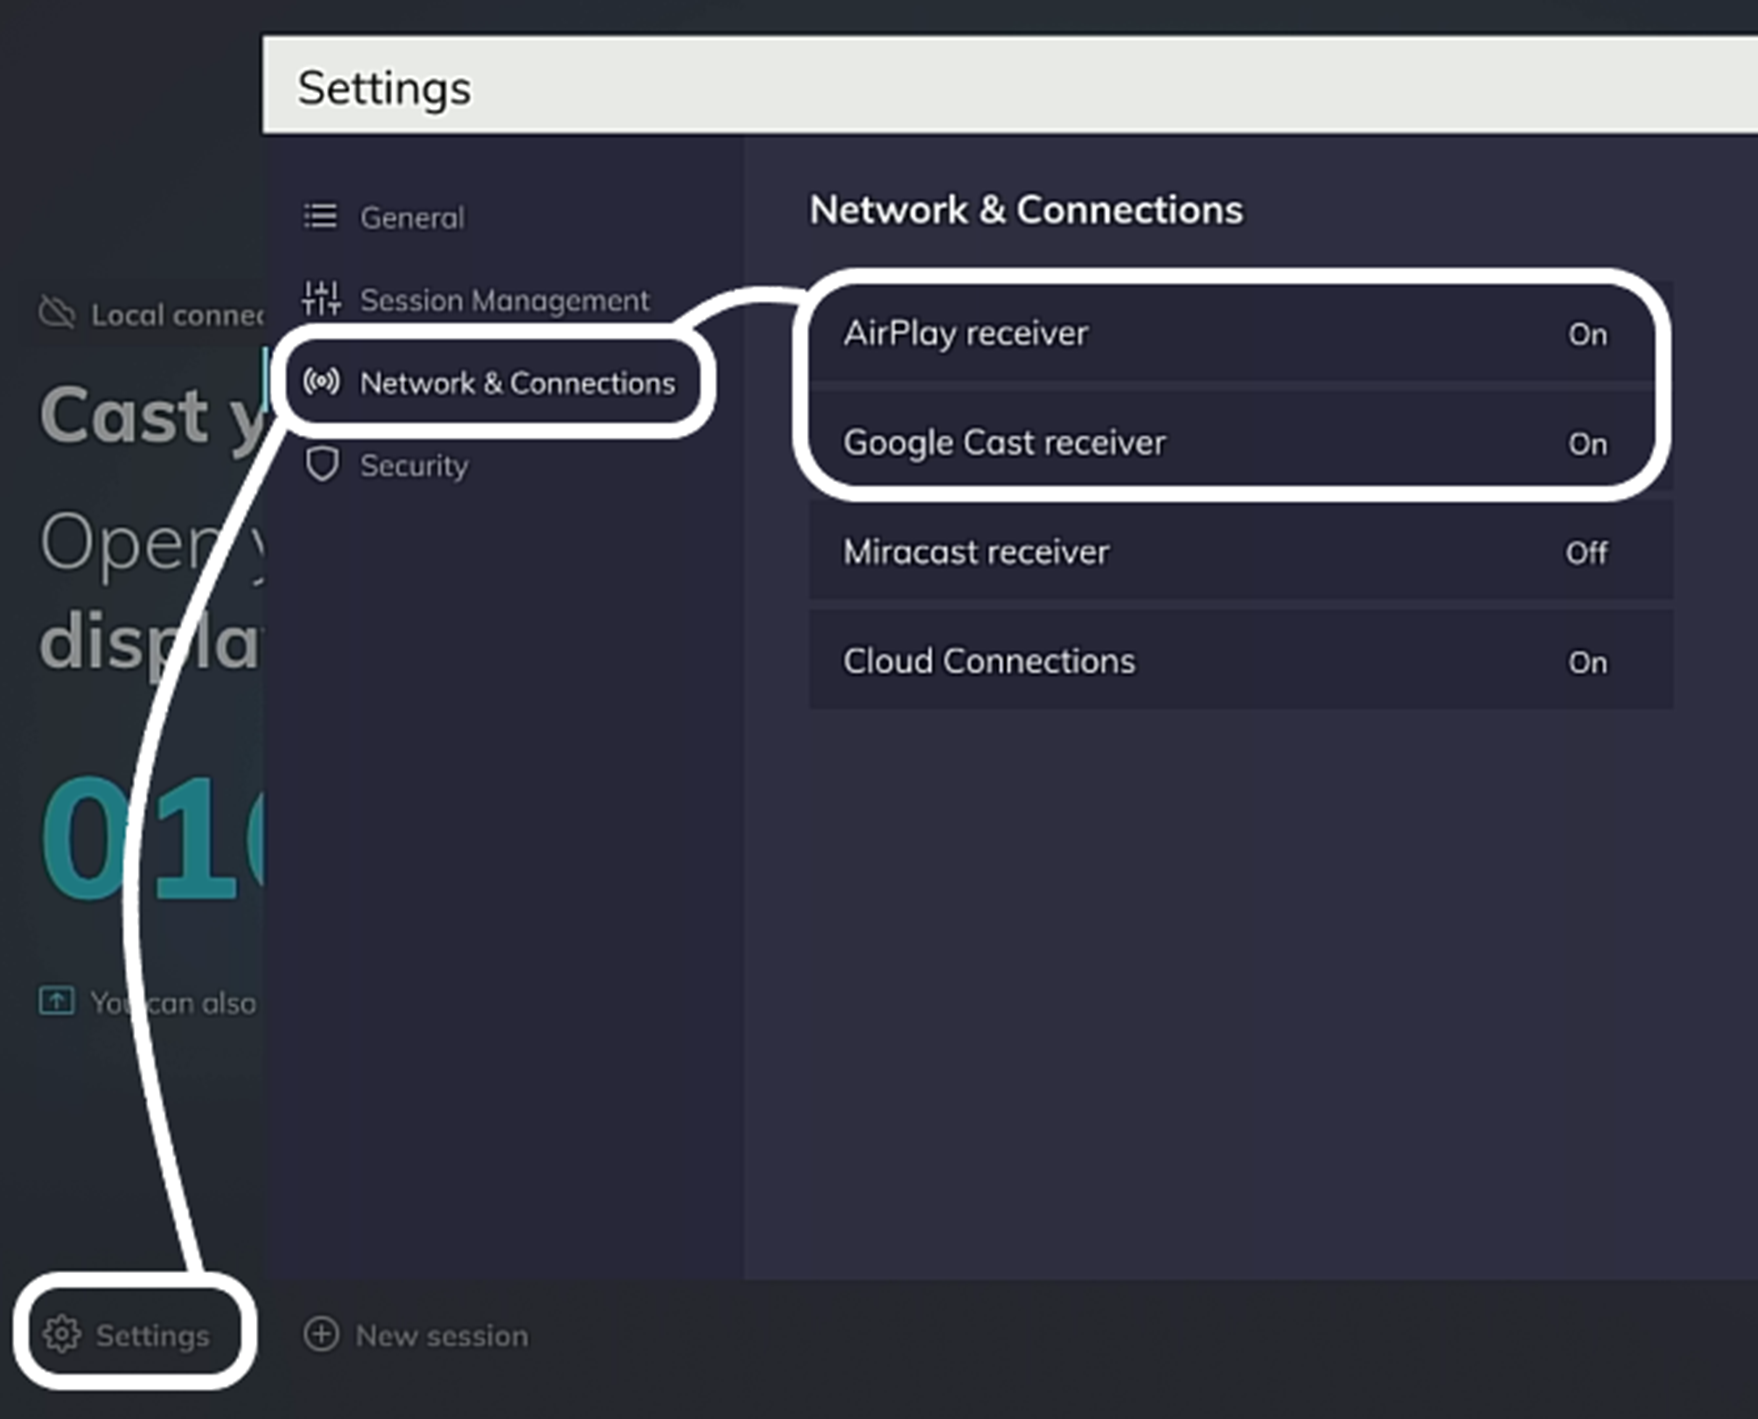
You can allow the option to use Apple AirPlay and Google Cast as options for casting to the panel. To enable these (an other) options, go to ‘Settings’>’Network & Connections’ and turn on the options you require, in this case, ‘AirPlay Receiver and ‘Google Cast Receiver’ (figure 5).
Note – I have not spent time working with the ‘Miracast Receiver’ or the ‘Cloud Connectors’.
Figure 5
‘Moderating’ the Casting
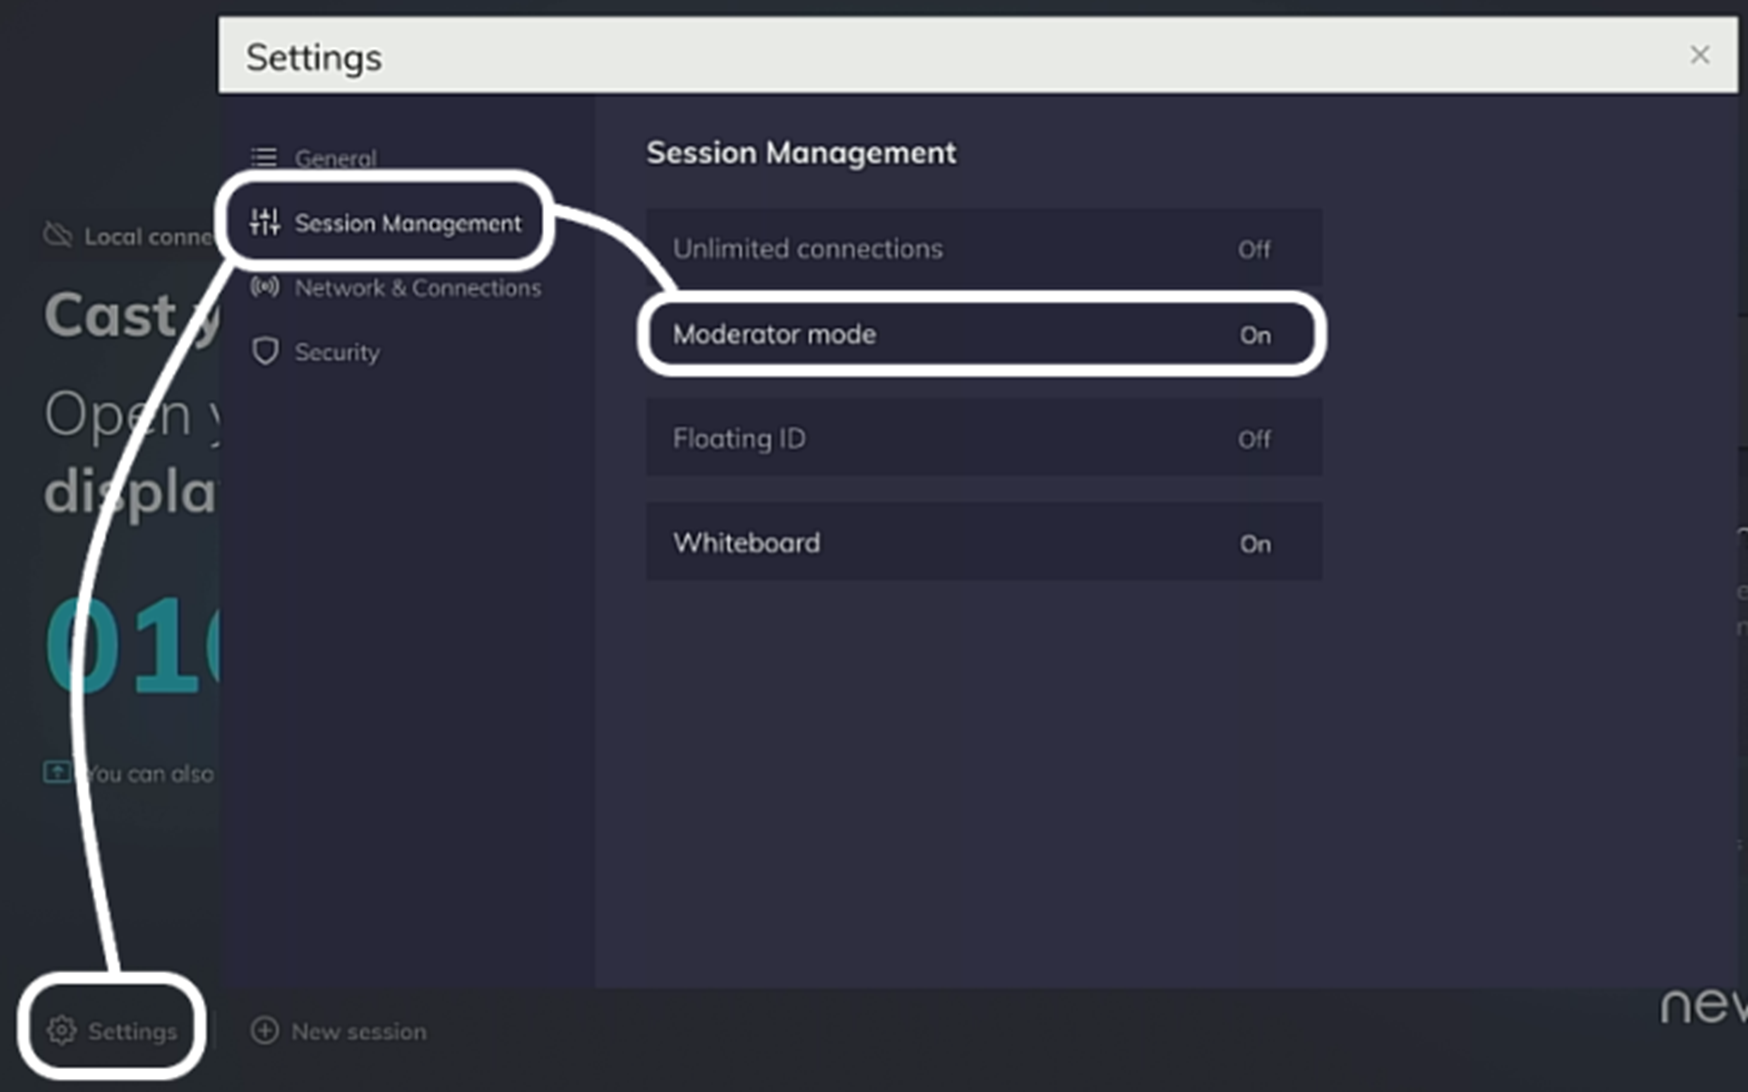
One option that is highly recommended, is to enable ‘Moderator Mode’ in the cast receiver app. This adds the option that the person at the panel has to allow anyone requesting to cast, permission to do so. If this option is not enabled, technically, a person could be walking by the classroom, see the code through the window, or even someone in the classroom itself, and cast something inappropriate to the panel.
To enable this option, go to ‘Settings’>’Session Management’ and turn on ‘Moderator Mode’.
Figure 6
Note – All of these settings are persistent, once you have configured your Newline Cast App., it will retain these settings for subsequent sessions.
The DisplayNote App.
There is also the option to download and use the DisplayNote App. To stream to the panel. This app. is available for Windows or the Mac OS and can be downloaded from here:
https://join-montage.displaynote.com/
It essentially performs that same operations as the Apple AirPlay or Google Cast options.
Note – This app. Is not available for the Chromebook.
Casting to the Panel
There are a number of options available now, to cast to the panel. The options are dependent on the setting you have chosen as follows:
Using the DisplayNote App. to Stream your Device
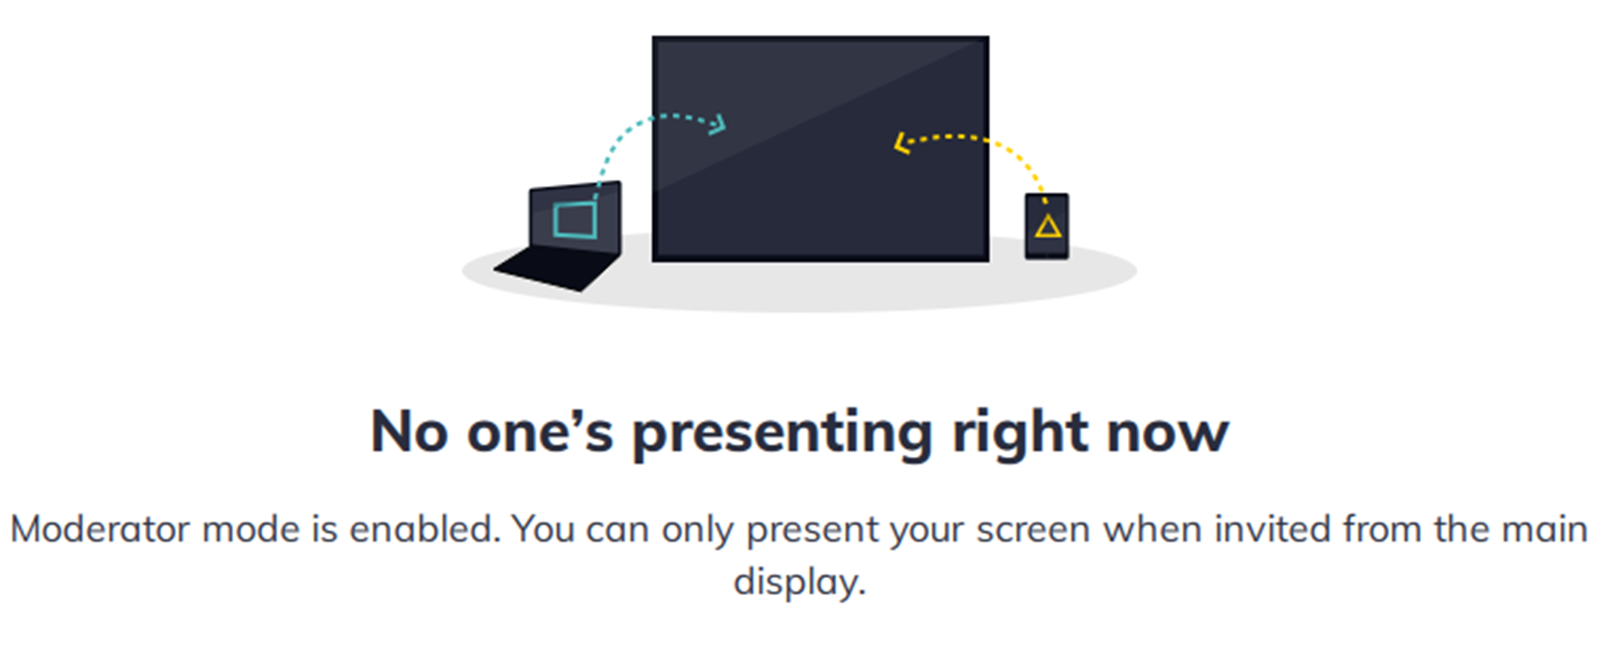
This app. will request the ‘Session ID’ (the code on the panel) and the name for the presenter (figure 7). When you connect to the session, you will either be able to ‘Share my Screen’ immediately, if ‘Moderator Mode’ is disabled (figure 8), or you will see the message that you can only present when invited as ‘Moderator Mode’ is enabled (figure 9).
Figure 7
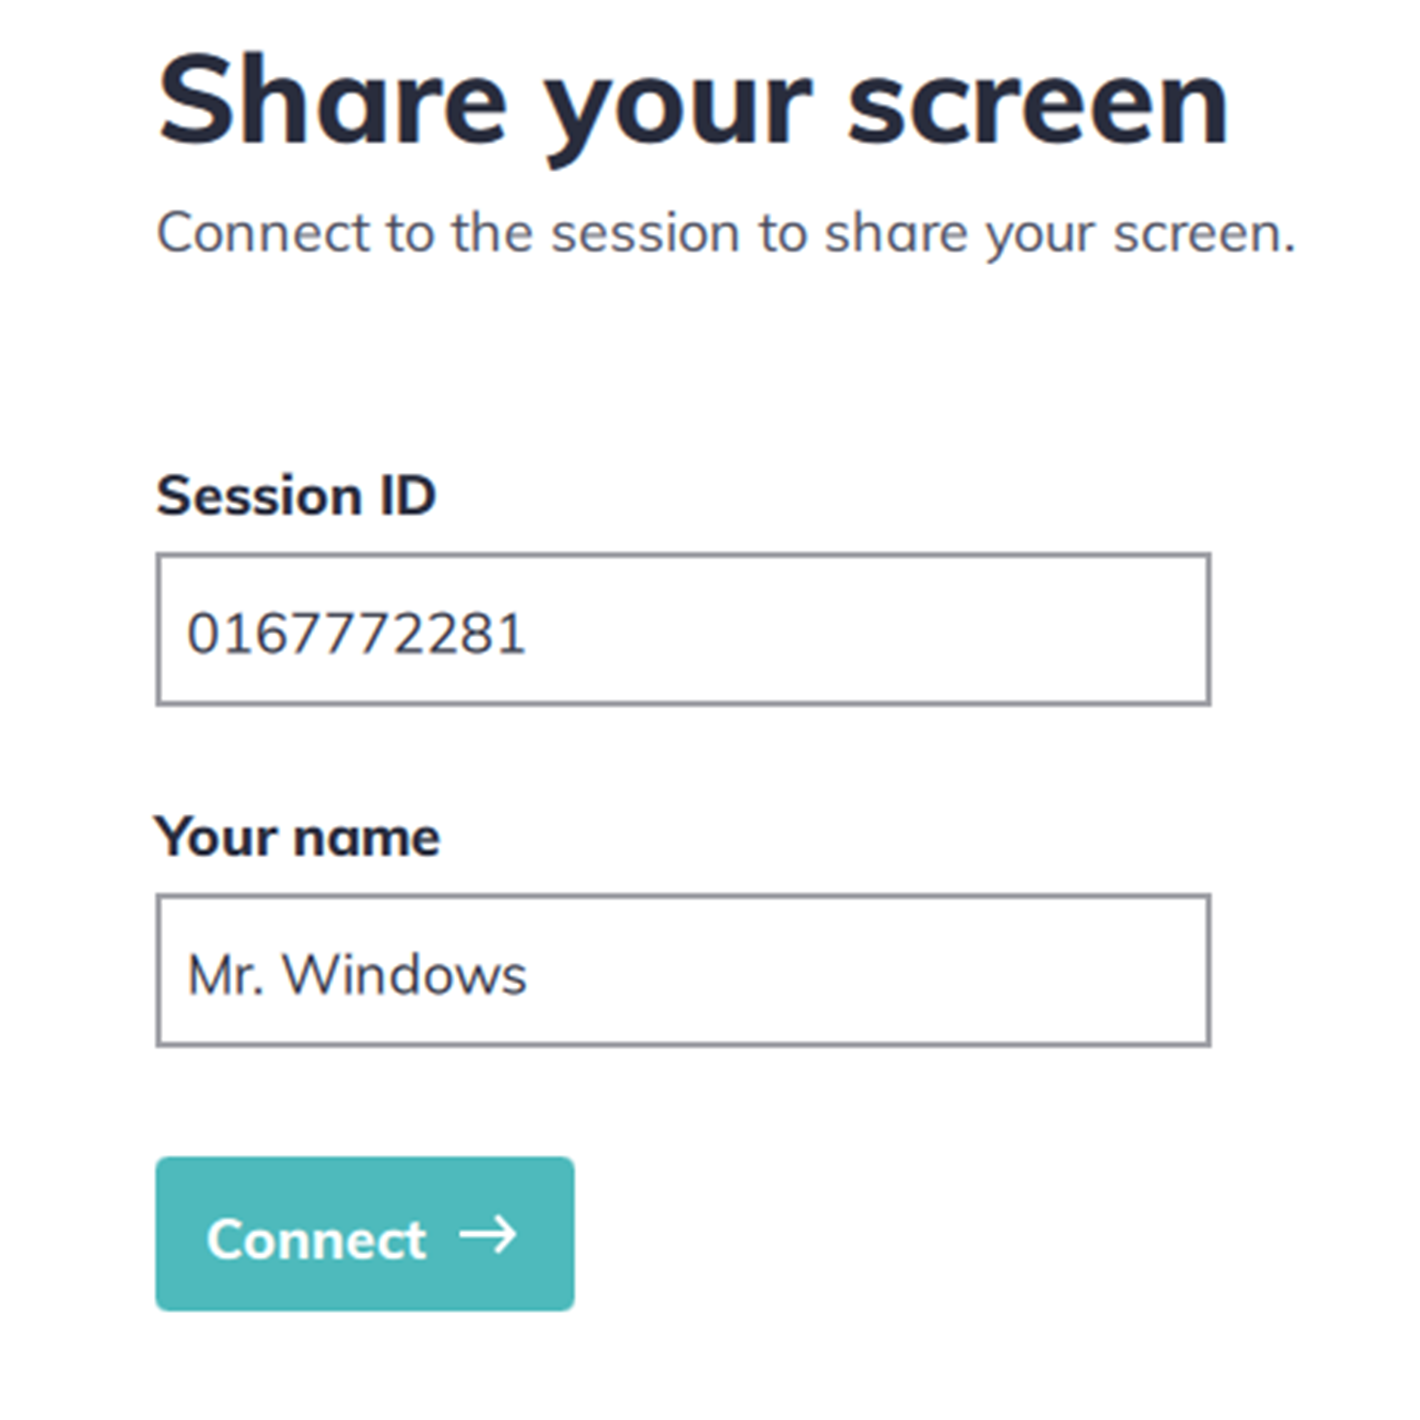
Figure 8
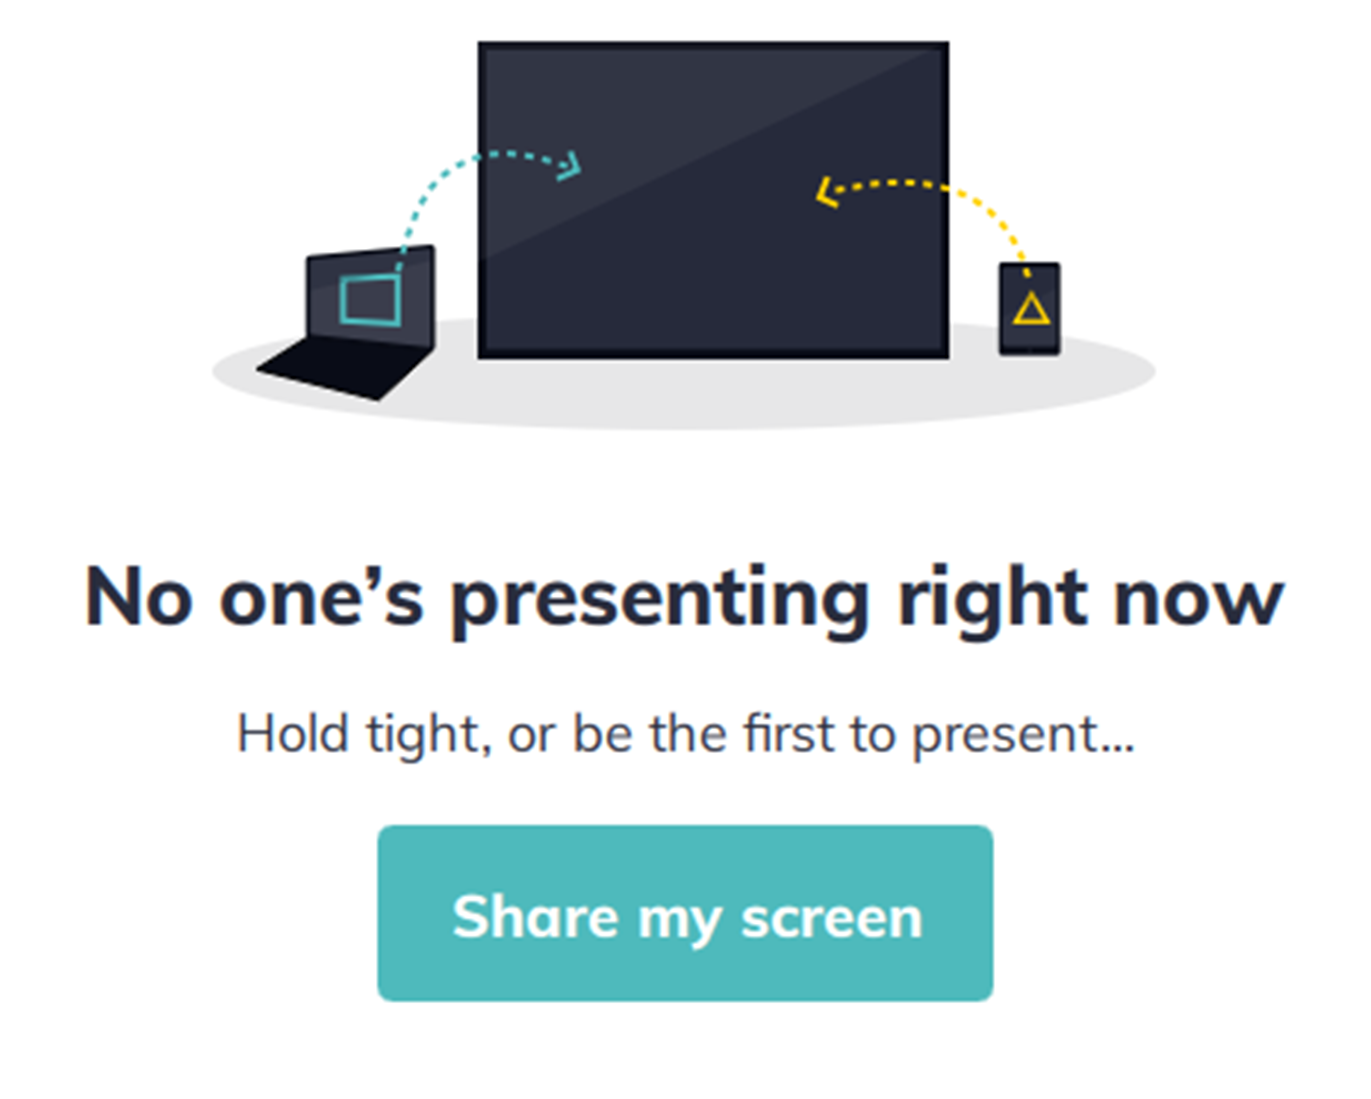
Figure 9
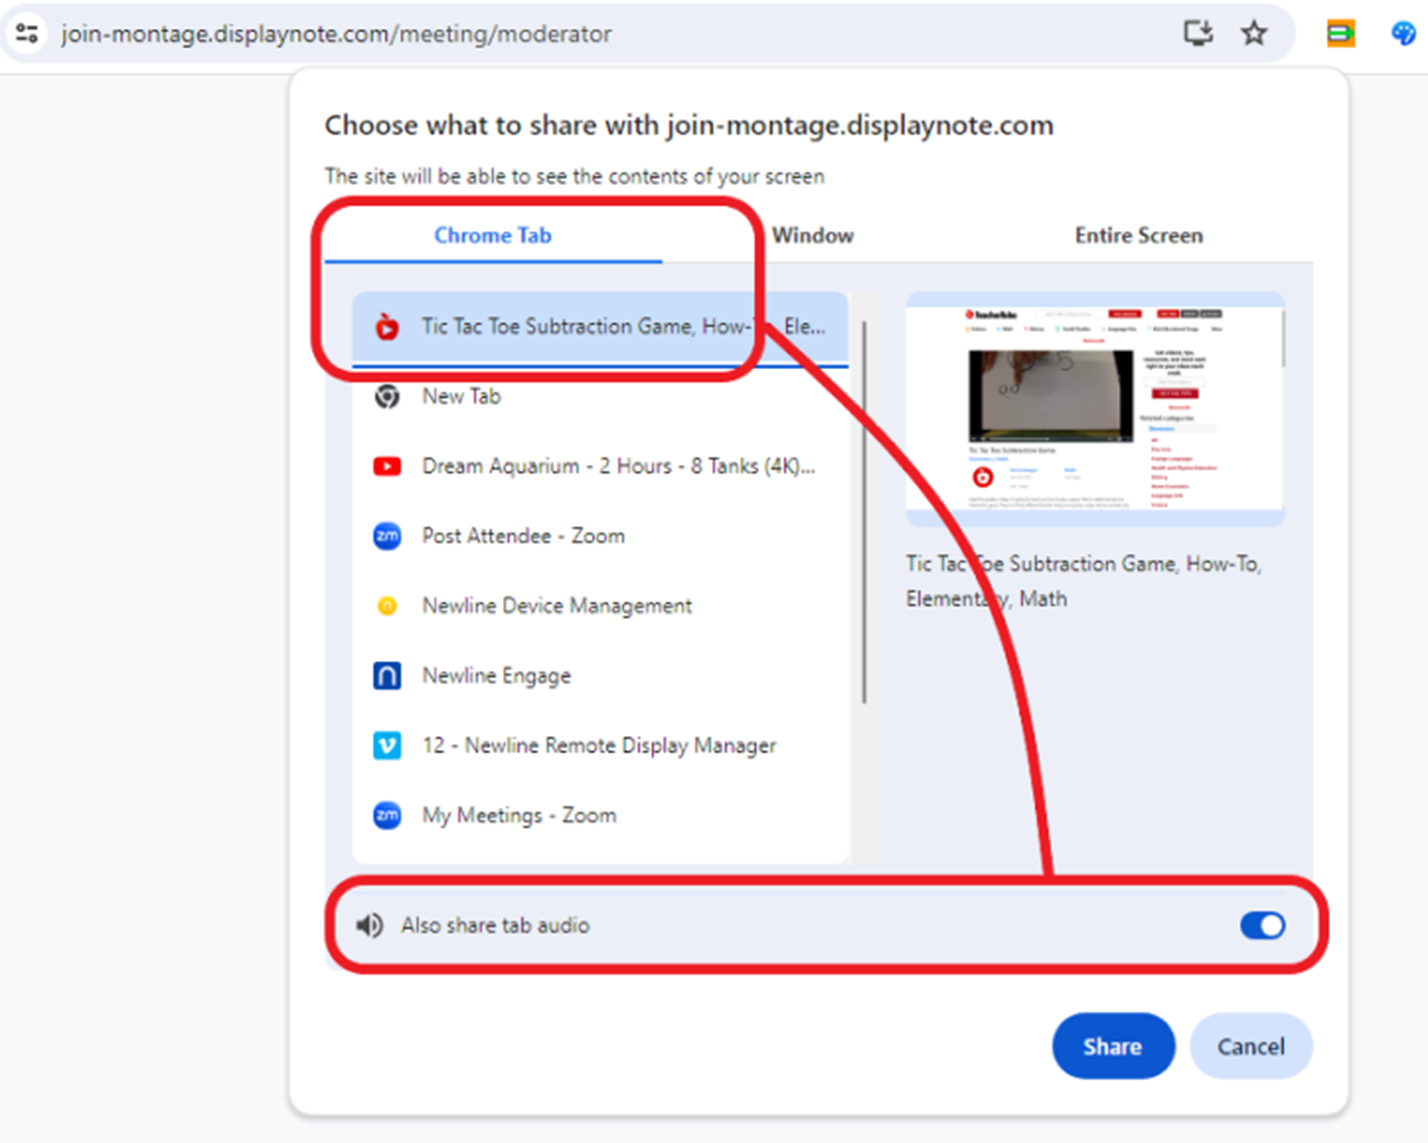
With ‘Moderator Mode’ enabled, the panel itself will display the connected devices, and if you tap on one of the devices in the list on the panel, you will have the option to ‘Invite to present’ (figure 10). When you invite the person to present, they will now see the option to ‘Share my Screen’ (figure 11).
Your shared/streamed content will now appear on the panel (figure 12). Audio may also be heard, please see note below.
Figure 10

Figure 11
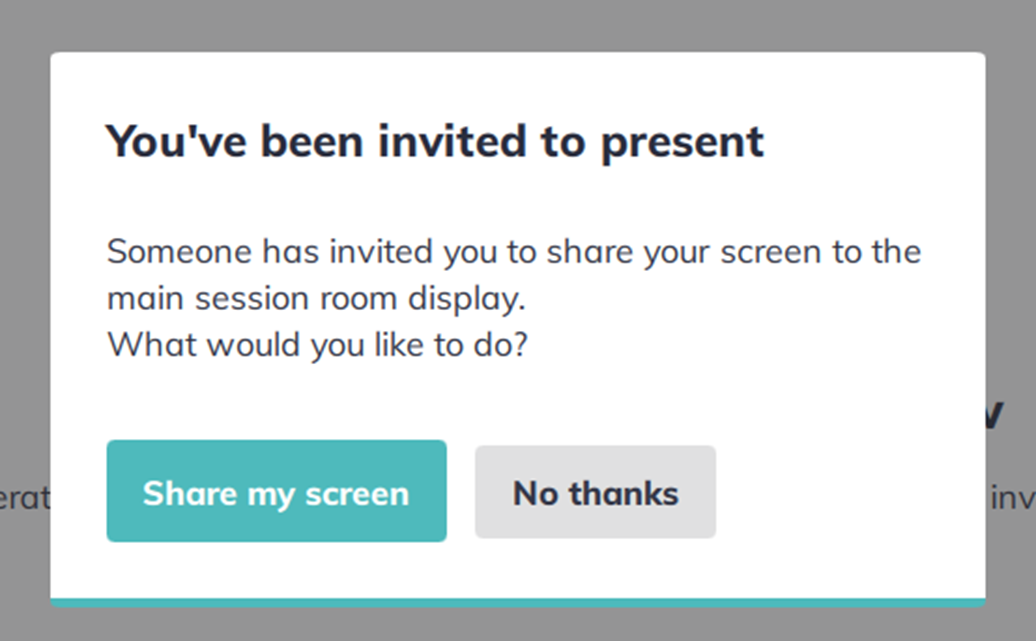
Figure 12
In all scenarios, you will have the option to choose the application window, or an entire screen/monitor to share.
Note – In my experience, and in the DisplayNote app. on Windows or on the Mac OS, you will only see the option to share audio (from YouTube for example) if you share the entire screen.
Note – This application will work in both the ‘cloud’ and ‘local Wi-Fi’ scenarios.
Using your Browser to Stream your Device
You can also stream from your device by going to the link https://displaynote.com/join in your browser. You will again, add the app. code from the panel into the browser page (figure 13), and follow the same processes as noted in the DisplayNote app. above to stream your device.
Note – This option is available for Chromebooks, Windows and Mac OS using the Chrome browser. Safari on the Mac OS is shown as not supported. The Edge browser on Windows is supported and works well.
Note – In this scenario, you will see the option to share audio (from YouTube for example) if you share the browser or the entire screen (figure 14).
Note – This browser streaming option will only work in both the ‘cloud’ scenario, the browser will not (cannot) allow streaming in the ‘Wi-Fi’ scenario.
Figure 13
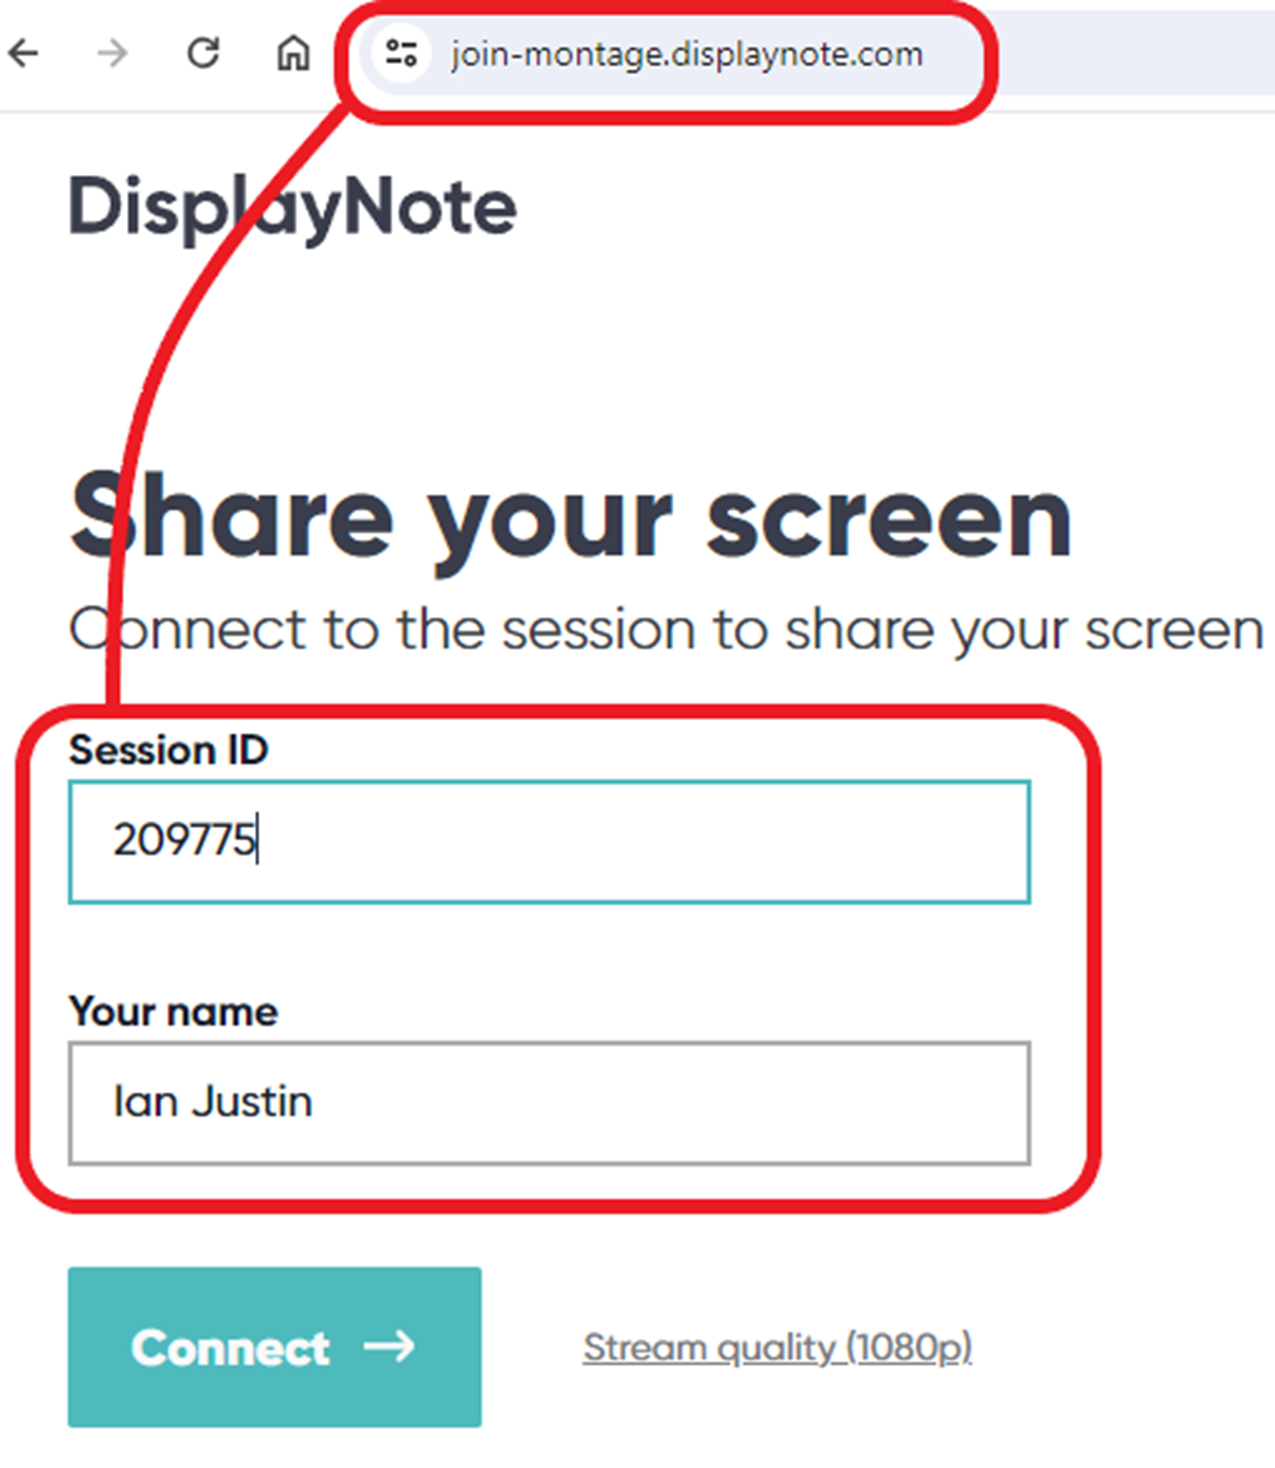
Figure 14
Using Google Cast to Stream your Device
This is one of the easier options, and very familiar to most users. In the Chrome browser, select the Google Cast (‘Display on another screen’) option to the top-right of your browser (extensions). If you do not see the cast option, follow the instructions on this page:
https://support.google.com/chromecast/answer/7249696?hl=en
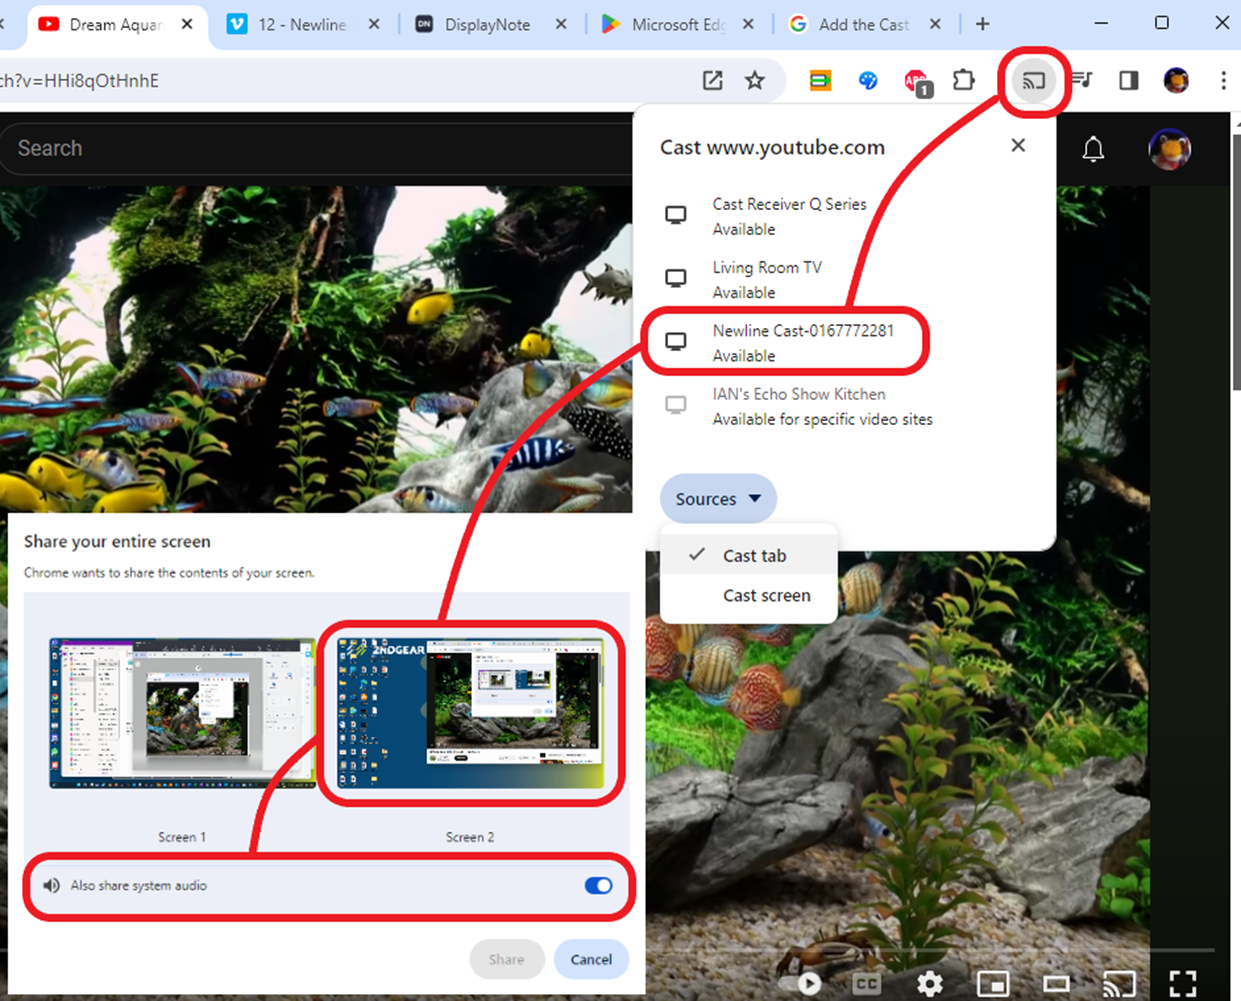
From there you can choose the Newline panel (note that the number beside the Newline Panel option int he casting menu is the code for the session on your panel). You can also choose to case a tab or the either screen, and select audio if required (figure 15).
Note – In Chrome (Chromebook) Windows and Mac OS using the Chrome browser, selecting a tab in the browser will cast the audio by default. In a Chromebook, the audio is cast for all options by default, in Windows, you will see the option to include audio if you cast an entire screen. In the Mac OS, you will not be able to cast audio if you share the entire screen.
Note – This streaming scenario will work in both the ‘cloud’ and ‘local Wi-Fi’ scenarios.
Figure 15
Using Apple AirPlay to Stream your Device
Note – From Mac OS, you should be able to go to ‘System Preferences’>’Displays’>’Add Display’ and add the ‘Q Series’ from the list. This will simply mirror your Mac display to the panel. To also mirror the audio to the panel, select the ‘Q Series’ from the ‘Sound’ options.
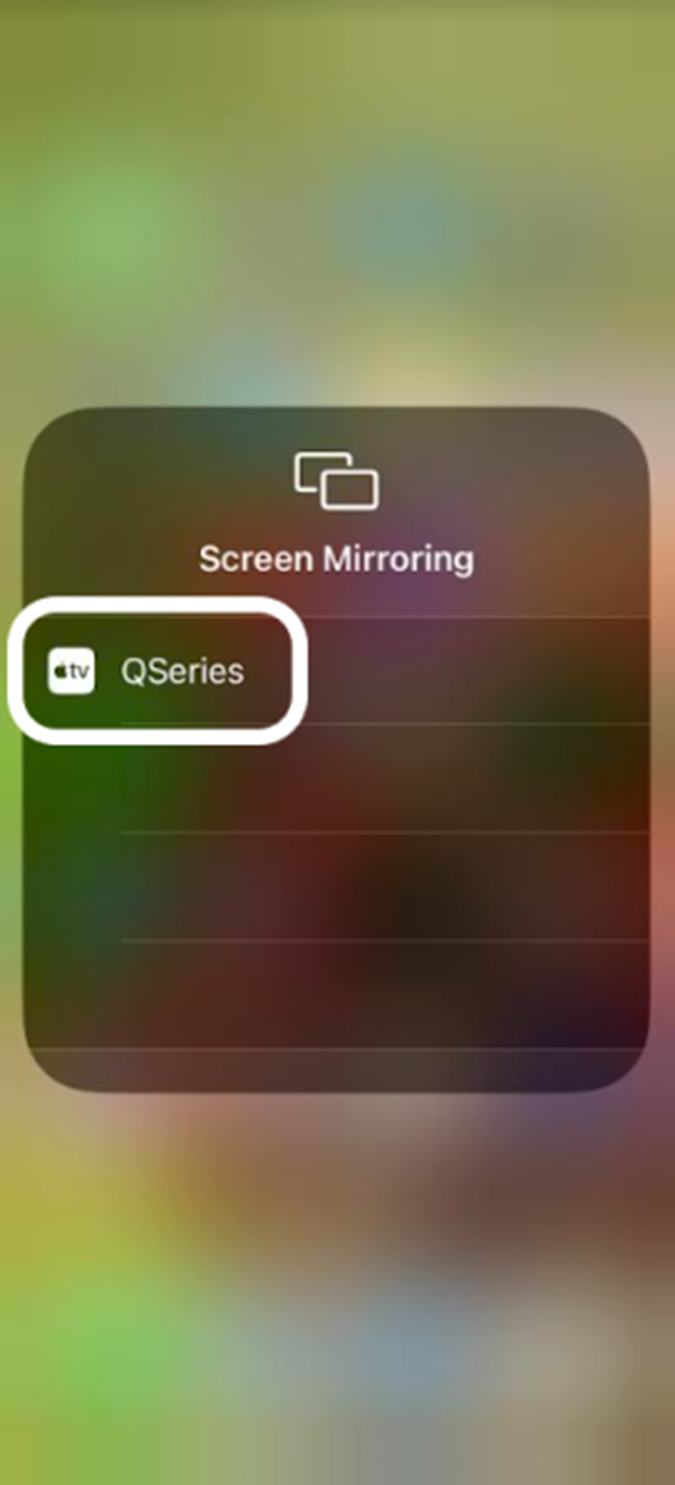
You can stream from your iPhone or iPad by selecting the ‘Mirroring’ option from your phone (pull-down from the top-right of your phone screen). There you select the mirroring option (figure 16) and then select the ‘Q Series’ option from the list (figure 17).
Figure 16
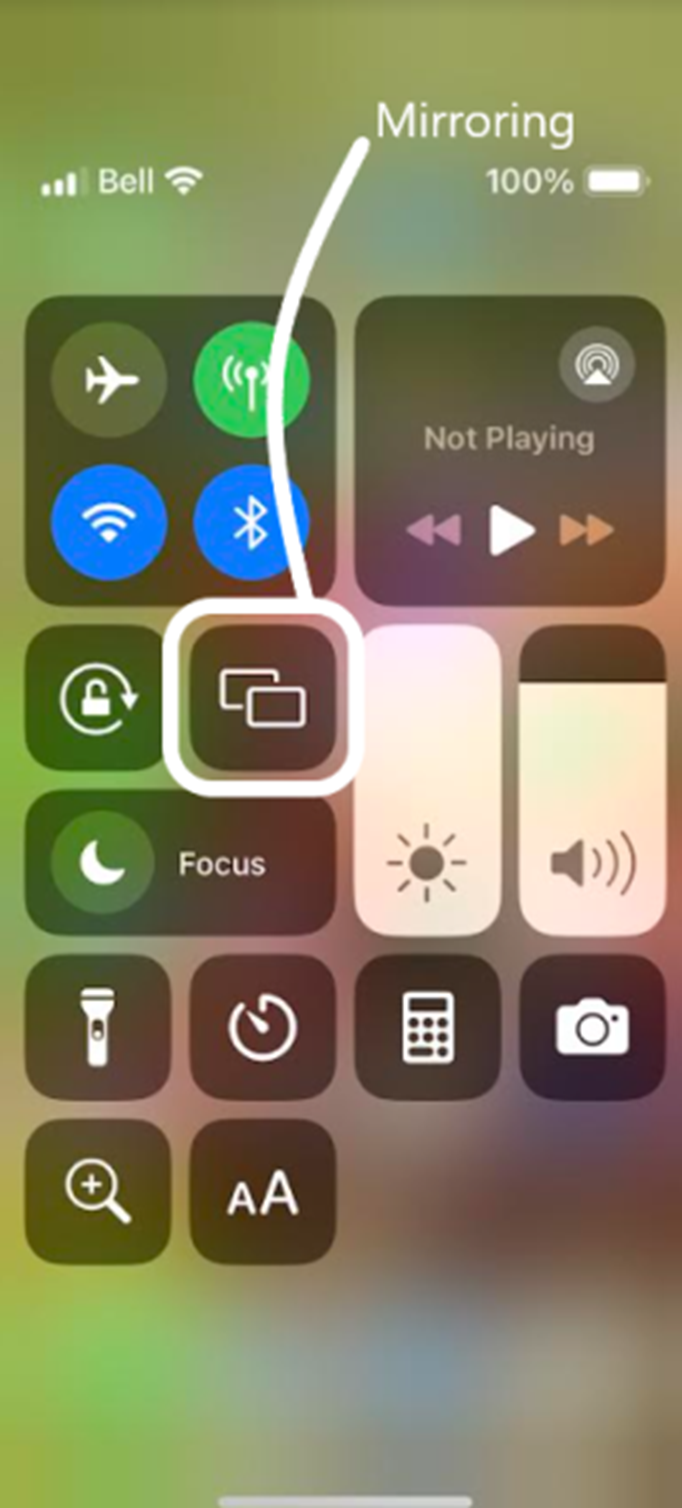
Figure 17
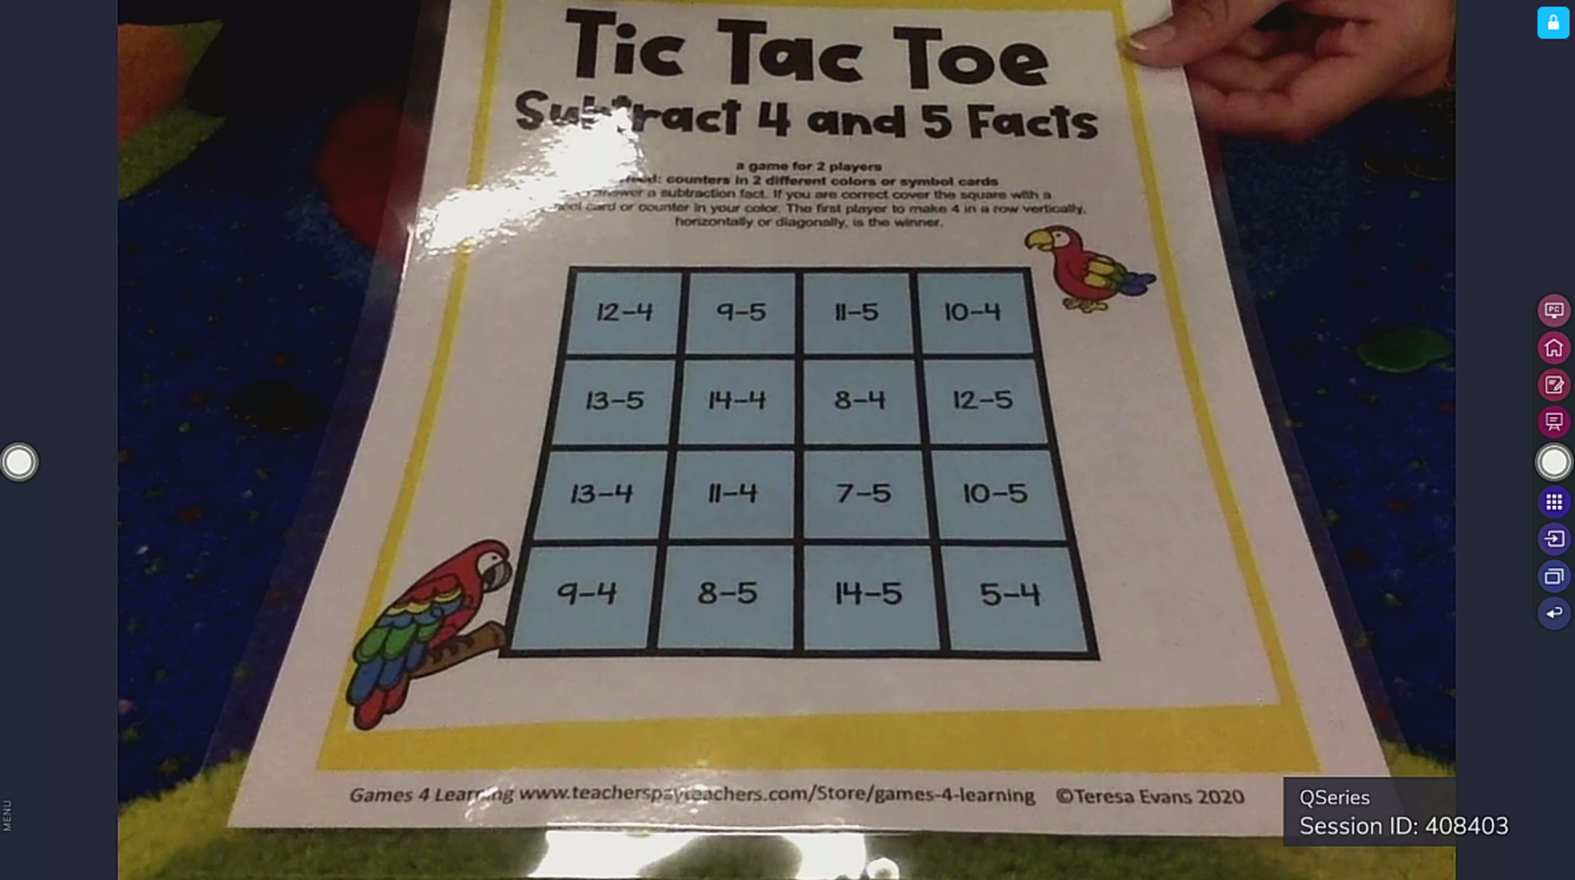
Your iOS device screen will then appear on the panel (figure 18). In the case of simply mirroring an iPhone screen to the panel, it will respect the responsive design of portrait vs. Landscape when you are in an application (figure 19).
Figure 18
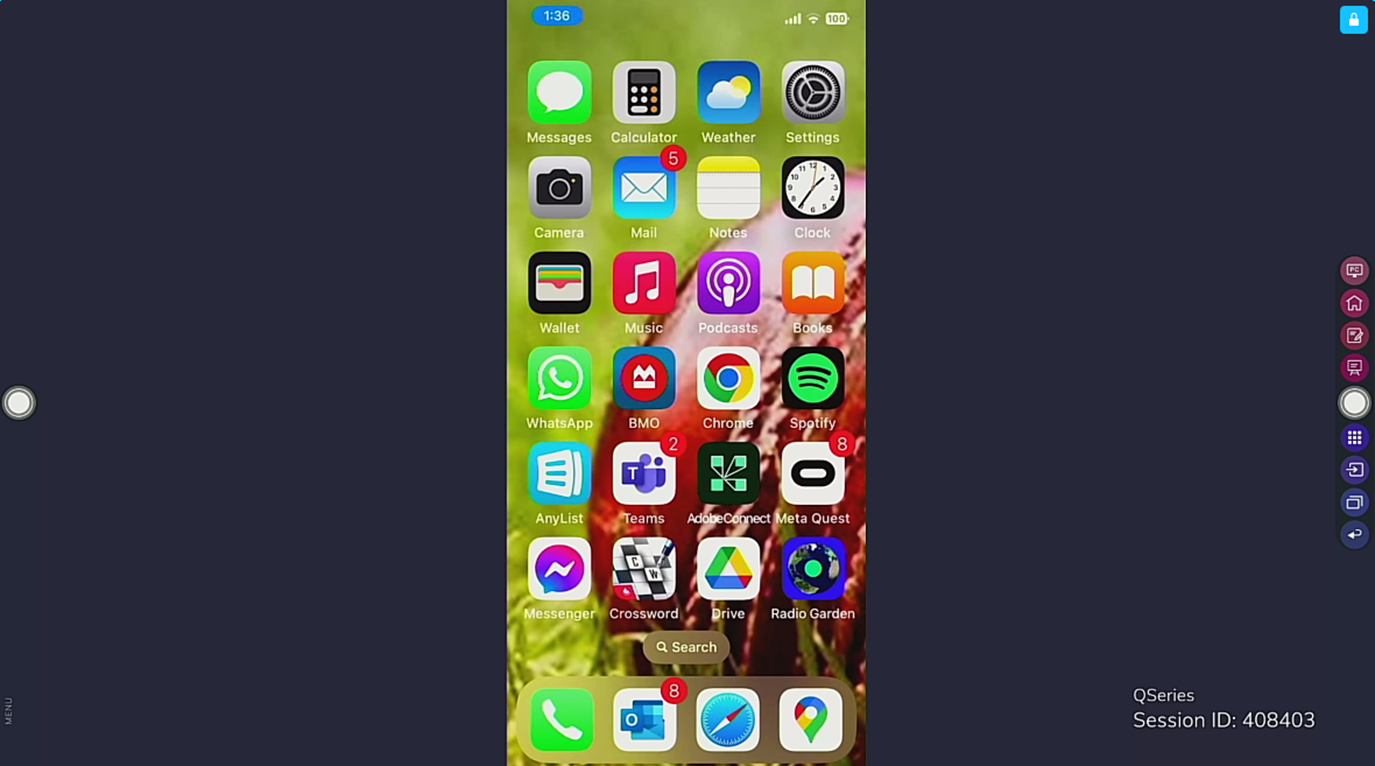
Figure 19

If you are in a browser (Chrome or Safari) on your iOS device and watching a video, you can select the casting option within the video and, again, select the ‘Q Series’ (figure 20) and cast to that panel (figure 21).
Note – The casting of audio seems very reliable in all of these instances of streaming from iOS devices.
Note – I have not been able to test these options against Android devices at this time.
Figure 20
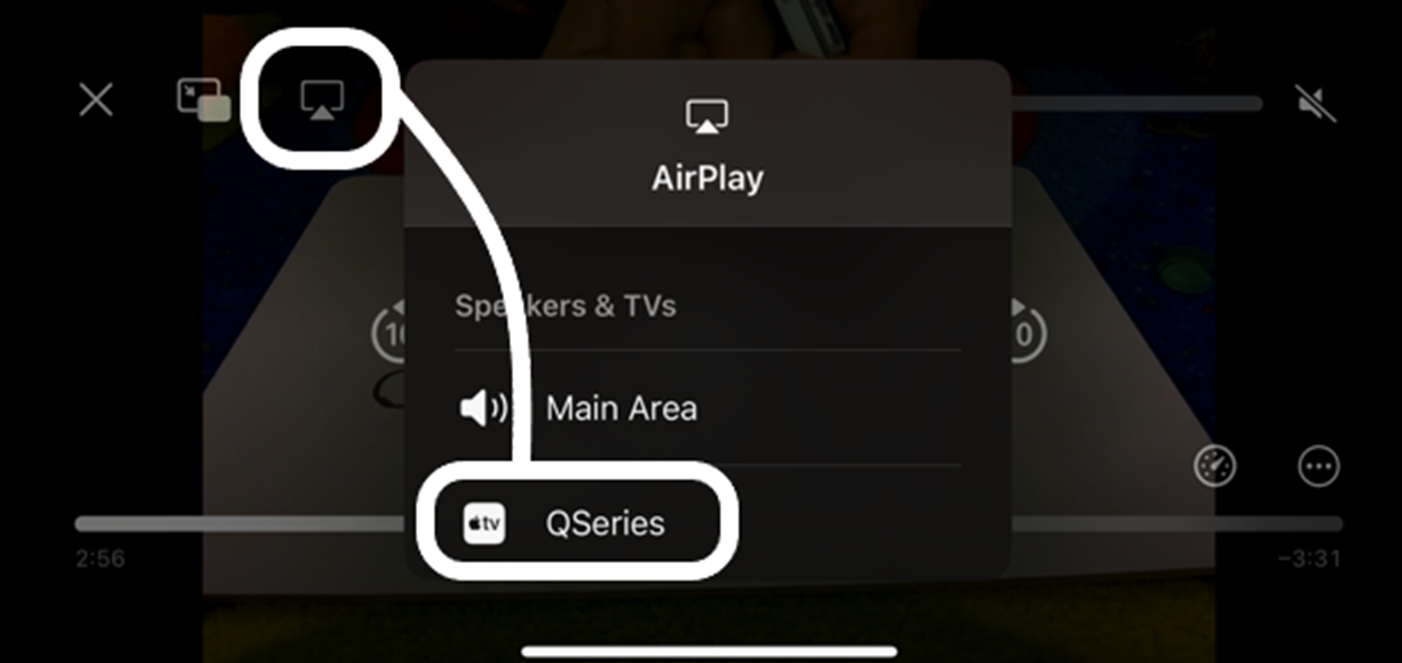
Figure 21
Managing Streaming of Devices from the Panel
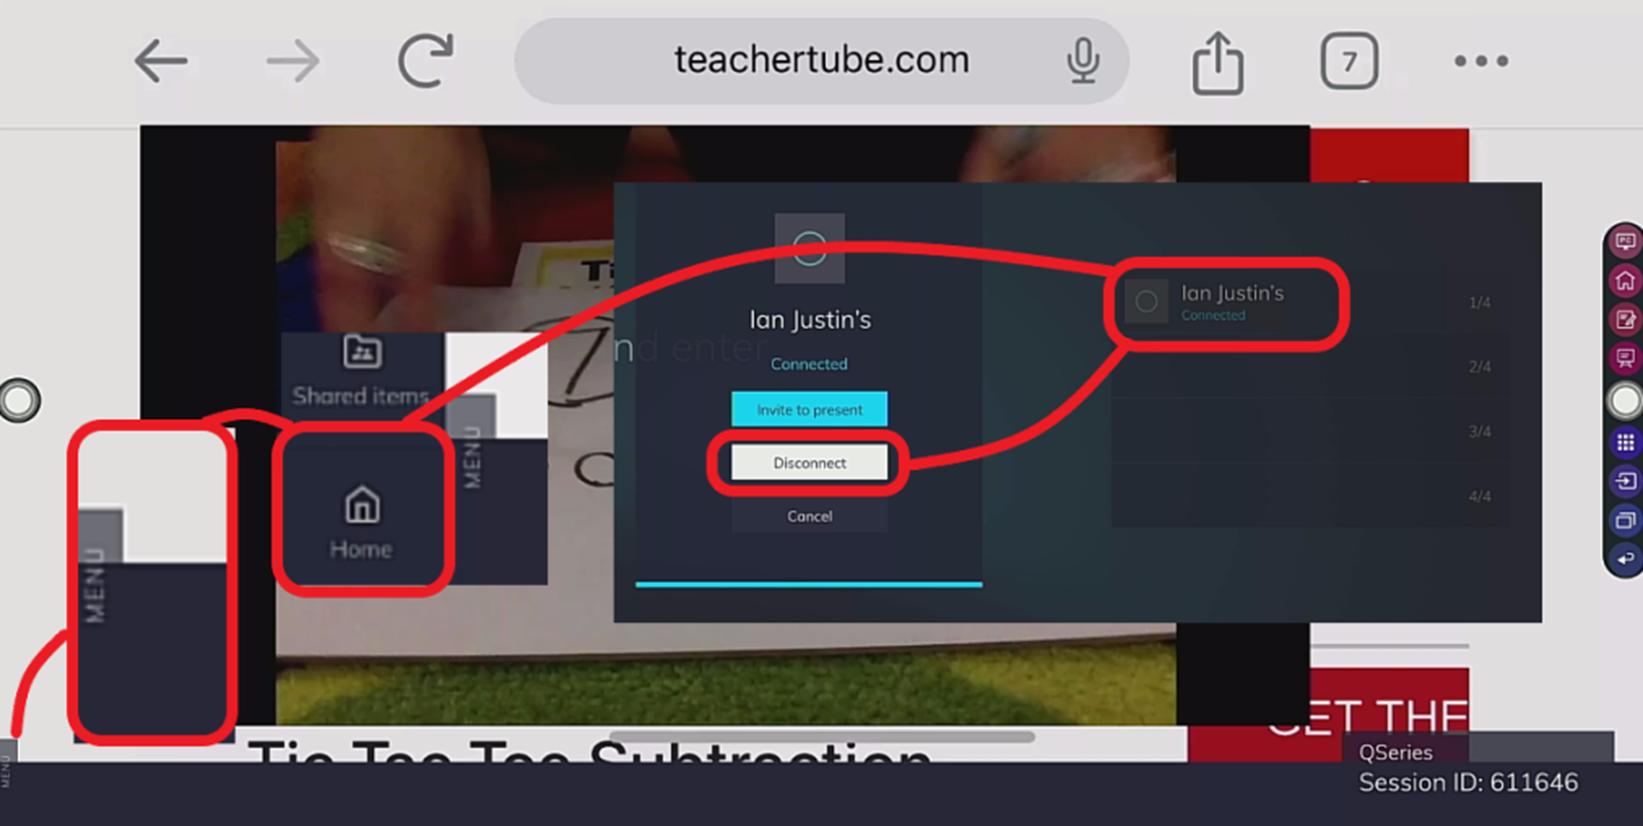
One important aspect of using the Newline Cast tool is to be able to control who is sharing from the panel, and importantly, to be able to remove their rights if necessary.
If a participant is sharing their screen up to the panel, there is a very small ‘Menu’ icon to the bottom-left of the panel. You can tap that to see the ‘Home’ icon, then tap ‘Home’ to open up the Newline Cast interface. From there you can select the user, and then ‘Disconnect’ (figure 22).
Figure 22